Google Search

Showing posts with label DIY. Show all posts

Tuesday, July 29, 2014

Bloominous - DIY Flowers Made Easy

Floral arrangements are a must at weddings. And with all the planning and designing, brides almost never find time to prepare for this, which is basically something I consider that would make or break the wedding. Ive never been good when it comes to floral arrangements, that's something I leave to the professionals. But sometimes they just cant deliver what you really want. And I have never been so glad in my life to come across what I consider as an event lifesaver- Bloominous.

Bloominous is an online shop that caters to all your wedding flower arrangement needs. All these and more, you can do at the comforts of your own home. The idea is actually very simple, all you have to do is choose which flowers you want and they will take care of the rest. The kit will be delivered to you, and everything you need to make that perfect bouquet is right at your doorstep in no time,

What makes it even more fun is that they have five different collections that you can choose from. So no matter what the theme of the event is, you'll be sure to find the perfect floral arrangement! Here are the different themes that you can choose from.

Party Pop Collection

This just screams "pink" in all direction! I really like this one because its so sweet and girly. The colors of the flowers stands out, giving the atmosphere that sweet feel.


Vintage Cottage Collection

This collection is classy at best. Its also french inspired, which makes the setting more romantic. The colors are simple but elegant, making it perfect for weddings.


Bohemian Desert Collection

For any fun events, this theme would be so perfect. The different colored flowers complements the whole setting, giving the place a playful and colorful atmosphere. The pop of colors on the florals are very unique and pretty too.


Country Charm Collection

I love sunflowers! And this collection will not disappoint. Ive always been fond of country living, and the bright yellow colors of the flowers displays that country feel.


Eco Chic Collection

Simplicity is indeed beauty. I like how subtle the decoration is, but still exudes classiness and elegance. This would be perfect if you are looking for floral arrangements that aren't overboard with decorations.


Lovely isnt it? Bloominous takes into consideration their clients, and their passion for this craft is something that you will see in their products. Here are some reasons as to why they are on top of their crafts:
  • When they say easy DIY, they really meant it.  The set comes with cut to order, dethorned and trimmed flowers, all prepped and ready for use.
  • All kits bought comes with easy to follow photo instructions and accessories, which makes assembling easier and faster. They also provide flower care products to make the arrangement last longer.
  • They have a team of professionals working to provide customers with only the best.
Plus, the pricing on each set is truly affordable. This gives you at elast 30%-50% discount compared to floral shops. Not to mention, having fun while making these DIY. Its a win-win situation.

To learn more about the shop and its amazing services, you can check check them out at the following sites:

Official Website: Bloominous ; Facebook ; Instagram ; Pinterest ; Twitter

Wednesday, May 28, 2014

Dearly Beloved, Are You Listening?


Lately I've been into DIY, making tees and tanks and shorts for summer. Haha. Its really hard though, since I cant sew so I just manually stitch the fabrics. But I really enjoy making my own clothes out of those old wardrobe that my mum is about to throw out. I basically went over those bags of old clothing that she kept.

Anyways today let me show to you two of my most fave DIY outfits. The first is my L ) V E Tee, which is of course in reference to one of my fave bands Angels and Airwaves. You can see me wearing it on the photo abouve :) Its one of the easiest ways to make a shirt. All you need is a blank piece of tee and then spray/paint the design you want. And you're done!

The second item I made is this distressed cut-off shorts. Actually this was a pair of baggy, old fashion bootleg jeans owned by my mother way back. I dont think it fits her anymore so I cut it and made this.


Its my first time to distress a pair of jean shorts so I'm still trying to figure out the best way how to do it, and how to make some designs on it. But overall I really loved the result and it has become my favorite pair of shorts already.


I didnt cut it too short by the way because I'm not used to showing that much skin. So the length would definitely have to depend on your preference.

And to finish my outfit, I got hold of my trusty vans sneakers. Gotta love Vans :) I think I had this for two years already and I am not going to replace it anytime soon since it still fits me haha. And also because I really like the doodle design on this. I think its unique as I havent seen anybody in my country wearing this? HAHA lol but seriously I think they dont sell it here. I got this on Journeys :P


Friday, January 4, 2013

Latest DIYs - Beauty and Fashion


Sayings/Framed Words

First up are these sayings or phrases that I printed out and framed. I got the idea from watching many room photos on weheartit, and since we will be moving to a new house soon, that would give me an opportunity to redecorate my room from scratch. Meaning.. I'll have total control of everything, from colors to style to furniture and all. And I specifically want to make a collage or something on my headboard.

awww there's dirt o_O

As you can see, i have printed two phrases on colored paper and framed them with colored frames too. These are quite easy to make, and you can even just put the printed output on the wall or have it laminated instead of framing them.

personal fave! haha

Bracelets

I have also been watching tutorials on Tumblr on how to make simple bracelets. Although the materials were quite hard to find here in the Philippines (sucks!), I was able to improvise some of them and managed to create two bracelets from scratch. They're not really flashy or something, just simple braided ones which are of course, my style.


This button bracelet is my favorite because I love the vintage look on the button (its just made of plastic though, not wood). Also, I love my bracelets to be of the garter types so that I can just put them on and off easily.


Makeup Box

I know that there are better make up box tutorial on the internet, but I choose this one because its really so simple and quite unique, in my opinion. All you need is just a piece of box (with cover or none), glue and different colored yarn. For the body of the box, I applied glue all over and then started covering the sides using the colored yarns. I alternated the yarn colors to give it a cute design (fail, haha), and its already done in a matter of minutes. You can then just cover the insides with colored paper if you want :) I used my finished make up box to store my lippies (sadly, i only have like 7 lip products).


Cut offs/Shorts

I was really bored and out of my mind when I saw my old pair of jeans on my closet. I have been looking for ways on how to dispose them because I no longer have space on my closet. And then I chance upon some cute shorts on the internet. That gave me the idea of cutting my jeans and making them into shorts. Of course, I dont have the skills for sewing, but yeah I managed. Haha.

This bow pocket shorts was my latest DIY. I saw something like this online and thought that it looks cute, so I made my own. The bow was easy to make, but attaching them on the pocket of the shorts was quite difficult for me. But in the end, the hard work really paid off because I love the result.

kawaii bow

This pink and purple ombre shorts was my very first DIY shorts. I really was not sure how to make it, and so I had to experiment on how to do it. First I had my shorts bleached, and then colored the upper half purple and the lower half pink. The resulting color was not so vivid, I guess because I only used a small amount of dye. Hmm maybe next time I'll know how the coloring thing works.

ombre shorts! pink and purple yay.

T-Shirt Printing

I have always wanted to do my own shirt designs, but my lack of talent is stopping me. Haha. But then I finally started making my own band shirts, starting with simple designs. Here are two of my latest shirts that I "painted" myself.

My first shirt happens to be the one on my current fave band! Yay Vic Fuentes and Pierce the Veil. I even changed my twitter username into @piercethejel hahahahaha.

Fan Girl Much?? HAHA I so love Pierce the Veil

This Blink 182 shirt is a combination of "painting" and "writing". Yep, I wrote the design on the shirt, literally. I had to buy laundry markers for me to be able to finish this thing, and the result was really nice. I am happy that I was able to pull of this design.

Fave line from this song <3

 Deconstructed Shirt

Just like the ombre shorts, I made an ombre t-shirt. This wasnt originally my plan, but seeing the nail polish stain on the sleeves made me angry with the shirt. I was about to throw it when I decided to dye it. But then again when I saw that the dye didnt cover the nail polish stain, I was angry again. I was thinking of throwing it out when I suddenly saw my laundry marker... Long story short, I drew designs on the stains.


And thank God the markers were able to hide the stupid stains. Forgive the uhm very elementary drawing. My mind was totally blank and the first thing that came to mind was music, thus the musical notes on the sleeves. Haha. But I dont really mind because I am just happy that the stains can no longer be seen, unless you look for it closely. Lol.


____________________________________________________________________________

And thats it! I know these are just petty stuffs but I really did enjoy making them. As of now I am still on the process of creating more DIYs. I'll show them again next time. Also, if you have any DIY ideas or tutorials that you would like to share, pls do tell me. Id' love to see them and try recreating them too. I think this will be my goal for 2013, recycling and creating DIY stuffs out of old items. I dont mind wearing clothes made out of my old ones, for me they are very practical and fashionable too.

Friday, January 27, 2012

Random Selcas and Updates

Heeeeya! I've been kind of neglecting my blog for days, having no updates~ Tss so not me. Its almost the end of January, and then here comes death month for me :| Haha lol what I mean is that Valentines Day is almost here.. There's nothing much on that day because I will be heartless on hearts day </3

Anyways I'd just like to post some random selcas ^o^ I took them using my phone and added some effects. I am really enjoying these editing apps on android because they are so cool, and easy to do than manual edits via photoshop :P

Wearing circle lenses already but tried the "enlarge eye" effect :D

Arrrggh stupid baggy eyes T_T seriously have to get rid of these dark circles and baggy bags. I wish I could just remove them lol.

Guess where? TILES ==> CR Haha

The next two images were given the "sweety" effect, thus the strong outcome of the colors. I love how my hair looks like this but in reality its really dull. I think I have to go to a parlor for hair coloring and stop doing it myself because clearly its a mess.


I'd also like to share this DIY earrings holder that I made. Its really crap and ugly to look at but for now this will do because I don't have anything to hold my earrings. I have been looking for like forever for a nice jewelry stand or box but I am so unlucky. Oh well, this is quiet okay so I'll just keep this one for now :)


I also received a lot of things in the mail and I hope to be able to review/post them soon. I just need to recharge myself and hopefully by February I'll be back to daily blogging again :)

Wednesday, December 7, 2011

DIY Home Made Oat Facial Scrub/Mask

Finally, I have tried the Home Made Oat Facial Scrub/Mask that I have been seeing all around YouTube and some blogger friends. It was a very fun and nice experience and I would like to share it to you guys. Hope you will learn something from this post =)

First, you must get hold of a pack of oats. Actually you will only need a small amount hehe. In this post I am using a brand of oats that I found on our local supermarket. It was very cheap and I got a lot of oats already. So yeah, I kept the rest because I plan to do this everyday to see if there will be any noticeable changes or whatever.


Okay to start, grab an ample amount of oats and place it in your palm, just like the photo shown below. There's no measurement as to how much or how many, but you can just decide on that part.


Pour water on your hands. You can do it by closing your palms in a fist like position and let the water from the faucet run down and enter your hands through the hole between your thumb and pointer finger, like the photo shown below.


Or you can also do it by just opening your palms and sprinkle droplets of water on the oats. I figured this is easier for me because I am in control of the amount of water, and I dont get that much oat wasted because of the running water lol.


During the procedure, slightly press on your hands on the oats to make it softer. And then repeat the same steps of adding water to the oats to soften it even more.


After a while you will see that instead of a clear liquid, the oat will produce a milky-ish liquid. I don't know if it helps but I used this on my face before I applied the oats, kinda like a toner or something. And mind you, it feels so nice on my skin :)


So after you have soften the oats with water, you are now ready to start scrubbing on your face =) Let this be a warning though; it can be quite messy as the oats tend to fall so make sure that you are in an open area so that you can clean the mess easily.


Scrubbing removes the impurities and dead skin cells, plus I am hoping it will remove the flaking on my skin too because I am currently peeling because of something that I am using.


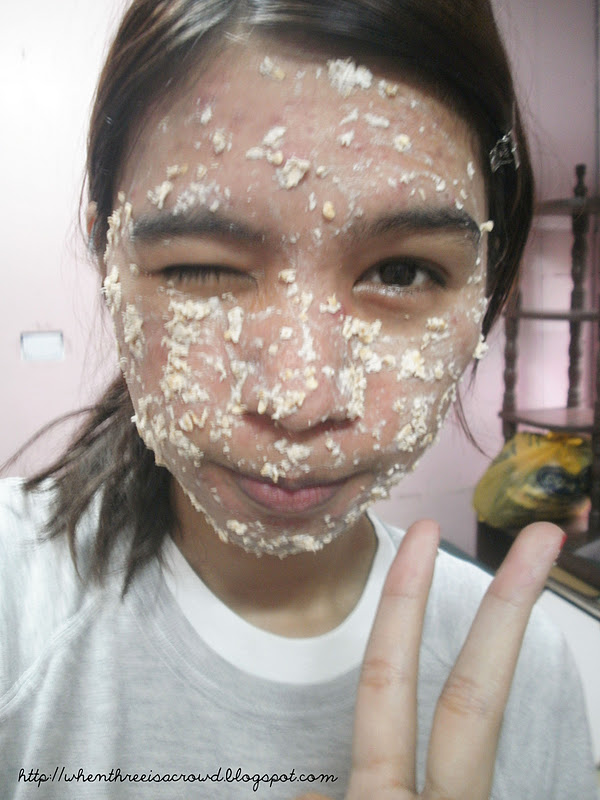
Supposedly this was for a facial scrub only, but I find the feeling of having oats on my face a nice and refreshing one so I thought of using it as a mask instead. Seeing how well they stuck to my face, I applied the rest of the wet oats on my face, and voilah~ instant face mask :D Oats does not smell like perfume or anything but its not that bad either. I dont know how to describe it but it reminds me of a rice granary or a place with so many rice and corn  lol. Anyways, here are two photos of me cam-whoring with the oats on my face.

Hi kids, this is the oat monster


After a few minutes, I started to feel that the oats have dried up so I washed my face already. The oats really stuck that much I had to scrub a little because they have dried up. After washing my face with water I felt refreshed and my skin felt clean too. Definitely I am impressed with this oat thingie. And because of this discovery, I am now going to do this every morning :)

So you see it was quite easy right? Plus not to mention its a healthy and safe way of cleansing your face because you are using natural ingredients. Oats has a lot of good benefits, you can Google it to check :3 I think this is a good way of letting my face rest from all the facial washes that I am using. I hope you guys get to try this one too because its really a nice routine, especially in the morning.

Monday, December 6, 2010

DIY Hair Bows

Yesterday I made a DIY hair bow. I got the idea from youtube and some online sites, so I made my very first DIY hair bow :D

The things I needed were pretty simple and easy to find. All I used are some pieces of scrap clothing, ribbons, needle and thread fro sewing, a hair pin and a glue gun. I must admit that it was hard for me because I haven't tried arts and crafts before. I had a hard time with the sewing and with the glue gun, I think I made a few mistakes every now and then but I managed. Although the final outcome is not something that you would consider as sale able, I'm still contented with the outcome. Well, you be the judge!


Its cute right? I used pink and green as a motif :)

 My little sister Jam wearing the hair bow.

 Close up


 Me wearing the hair bow. Sorry for the flash :P

 Dont mind the background, haha.


So what do you think?